<?xml version="1.0" encoding="UTF-8"?>
<feed xmlns="https://www.w3.org/2005/Atom">
    <title>博客 | dsy4567 的小站</title>
    <link rel="alternate" type="text/html" href="https://dsy4567.github.io/blog.html" />
    <link rel="self" type="application/atom+xml" href="https://dsy4567.github.io/rss.xml" />
    <updated>2023-01-22T12:48:59.719Z</updated>
    <generator uri="https://github.com/dsy4567/dsy4567.github.io/">dsy4567/dsy4567.github.io</generator>

<entry>
    <title>2024 年总结——我在地址栏输入 A-Z，浏览器会补全哪些域名？</title>
    <link rel="alternate" type="text/html" href="https://dsy4567.github.io/blog/2024-browser-history/" />
    <id>2024-browser-history</id>
    <published>2025-01-02T12:37:17.008Z</published>
    <updated>2025-01-02T12:37:17.008Z</updated>
    <summary>2024 年总结——我在地址栏输入 A-Z，浏览器会补全哪些域名？
2024 年已经过去，在这一年里，我有多半时间都是在和浏览器打交道。逛完别人的博客后，我也学到并想尝试一下这个别样的总结方法。
</summary>
    <author>
        <name>dsy4567</name>
        <uri>https://dsy4567.github.io/</uri>
    </author>
    <category term="Default" />
    <content type="html" xml:lang="zh-cn">
        <![CDATA[
<h1 id="2024-年总结我在地址栏输入-a-z，浏览器会补全哪些域名？">2024 年总结——我在地址栏输入 A-Z，浏览器会补全哪些域名？</h1>
<p>2024 年已经过去，在这一年里，我有多半时间都是在和浏览器打交道。逛完别人的博客后，我也学到并想尝试一下这个别样的总结方法。</p>
<!-- more -->

<h2 id="a">A</h2>
<ul>
<li>archlinux.org：2024 年 7 月尝逝安装 Arch Linux，结果第一次就装废了，因急着干活遂换回 Deepin。</li>
</ul>
<h2 id="b">B</h2>
<ul>
<li>bilibili.com：2022年底/2023年初开号，2024年中旬开始重度使用并抛弃某音，至今已陪伴我 200+ 天。</li>
<li>bing.com：必应搜索，不咋用（强制跳转 cn.bing.com）。</li>
<li>bbs.deepin.org：Deepin 的论坛，偶尔会去逛，随缘解答问题。</li>
<li>board.yang-qwq-top：某人的留言板，活跃用户似乎仅有我和站长。</li>
</ul>
<h2 id="c">C</h2>
<ul>
<li>cn.bing.com：必应搜索，同上。</li>
<li>chatgpt.com：ChatGPT 2024 年官宣不登录即可使用。<spoiler>但我梯子不干净（悲</spoiler></li>
</ul>
<h2 id="d">D</h2>
<ul>
<li>dsy4567.icu：本站，没什么好说的（</li>
<li>developer.mozilla.org：Web 开发少不了的网站，有最丰富的文档和相对完善的翻译。</li>
<li>dash.cloudflare.com：Cloudflare 仪表盘在绑好域名和 GitHub 仓库后就没咋用过，网站访问统计等信息主要看邮件。</li>
<li>deepin.org：我正在用的操作系统，减轻新手痛苦，节约老手时间。</li>
</ul>
<h2 id="e">E</h2>
<p>无（</p>
<h2 id="f">f</h2>
<ul>
<li>feixiaoqiu.com：原神抽卡分析。</li>
</ul>
<h2 id="g">G</h2>
<ul>
<li>greasyfork.org：油叉，有超多的用户脚本，可用来大幅提高上网冲浪体验，我也在上面发过脚本。</li>
<li>github.com：全球最大的开源社区<spoiler>和同性交友网站（jiushi</spoiler>。</li>
</ul>
<h2 id="h">H</h2>
<ul>
<li>hellogithub.com：定期发布一些精选的 GitHub 项目。</li>
</ul>
<h2 id="j">J</h2>
<ul>
<li>juejin.cn：掘金上有大量优秀博文，是一个提升自我的好地方。</li>
<li>jyshare.com：菜鸟工具，里面的正则表达式测试工具经常用。</li>
</ul>
<h2 id="k">K</h2>
<ul>
<li>kugou.com：除了一次要分析接口就没用过，2023 年初抛弃酷狗转网易云。</li>
</ul>
<h2 id="l">L</h2>
<ul>
<li>localhost：这个……也算吧（</li>
</ul>
<h2 id="m">M</h2>
<ul>
<li>music.163.com：2023 年初抛弃酷狗转网易云，年底开始高强度使用，至今已听 5000+ 首歌</li>
<li>miyoushe.com：水社，2023 年底入原，2024 年 7 月先后入绝和铁。</li>
</ul>
<h2 id="n">N</h2>
<ul>
<li>ncm.vercel.dsy4567.icu：自建网易云音乐 API，用于测试自己写的第三方网易云客户端。<spoiler>2023 年 10 月因为这个号被冻了，<del>网易云你***</del></spoiler></li>
<li>note.ms：公共笔记，我以前经常会备份和恢复 /ad 里的内容，有时候也会在这个网站玩一整晚。</li>
</ul>
<h2 id="o">O</h2>
<ul>
<li>outlook.live.com：挂后台收邮件。</li>
</ul>
<h2 id="p">P</h2>
<ul>
<li>paimon.moe：主要用来抽卡分析和养成规划。</li>
</ul>
<h2 id="q">Q</h2>
<ul>
<li>qwq.dsy4567.icu：杂物间/在别处发帖时的图床。</li>
</ul>
<h2 id="r">R</h2>
<ul>
<li>runoob.com：菜鸟教程，我会的 JavaScript、C++ 等编程语言前期都是在上面学的。</li>
<li>ruanyifeng.com：阮一峰的网络日志，里面的科技爱好者周刊我几乎每周都看。</li>
</ul>
<h2 id="s">S</h2>
<ul>
<li>store.steampowered.com：只加心愿单，没钱买游戏。</li>
<li>sr.mihoyo.com/cloud/：云崩铁，启动！</li>
</ul>
<h2 id="t">T</h2>
<ul>
<li>tldr.inbrowser.app：可以速查许多命令的常见用法。</li>
<li>translate.google.com：谷歌翻译，个人认为使用体验中规中矩。</li>
</ul>
<h2 id="u">U</h2>
<ul>
<li>u.sb：烧饼博客，主要看上这简短的域名。</li>
</ul>
<h2 id="v">V</h2>
<ul>
<li>v2ex.com：又一个能让我逛半天的地方。</li>
<li>vscode.dev：在线 VSCode 编辑器，嫌两个 Chromium 吃内存时会用。</li>
</ul>
<h2 id="w">W</h2>
<ul>
<li>web.telegram.org：纸飞机，加了杂七杂八的群，也和同好之友私聊过。</li>
</ul>
<h2 id="x">X</h2>
<ul>
<li>x.com：原推特，用来看外面<del>丰富多彩（？）</del>的世界。</li>
</ul>
<h2 id="y">Y</h2>
<ul>
<li>ys.mihoyo.com/cloud/：仅用于获取抽卡记录链接，键鼠实在操作不来（</li>
<li>ypm.dsy4567.icu：自建 YesPlayMusic，万恶的网易云严打第三方客户端后就不用了（悲</li>
</ul>
<h2 id="z">Z</h2>
<ul>
<li>zhihu.com：一个问答网站，还是一个能让我逛半天的地方。</li>
</ul>

        ]]>
    </content>
</entry>
<entry>
    <title>用 Vercel + DevSidecar 实现科学上网</title>
    <link rel="alternate" type="text/html" href="https://dsy4567.github.io/blog/vercel-dev-sidecar-fq/" />
    <id>vercel-dev-sidecar-fq</id>
    <published>2023-08-22T13:10:35.171Z</published>
    <updated>2023-08-22T13:10:35.171Z</updated>
    <summary>用 Vercel + DevSidecar 实现科学上网
由于本人翻墙时几乎只需要浏览网页，因此解除了封印的 DevSidecar（以下简称 DS）成为了我的首选翻墙工具。而且我听说 Vercel 对大陆线路做了优化，决定在 Vercel 上搭梯子。
</summary>
    <author>
        <name>dsy4567</name>
        <uri>https://dsy4567.github.io/</uri>
    </author>
    <category term="Default" />
    <content type="html" xml:lang="zh-cn">
        <![CDATA[
<h1 id="用-vercel--devsidecar-实现科学上网">用 Vercel + DevSidecar 实现科学上网</h1>
<p>由于本人翻墙时几乎只需要浏览网页，因此解除了封印的 DevSidecar（以下简称 DS）成为了我的首选翻墙工具。而且我听说 Vercel 对大陆线路做了优化，决定在 Vercel 上搭梯子。</p>
<!-- more -->

<p>搭 nm 的梯子（</p>
<p><img src="/blog/vercel-dev-sidecar-fq/img/wf.webp" alt="s:432x466 你这是违法行为"></p>
<h2 id="相关法律法规">相关法律法规</h2>
<h3 id="中华人民共和国计算机信息网络国际联网管理暂行规定节选">中华人民共和国计算机信息网络国际联网管理暂行规定(节选)</h3>
<blockquote>
<p><a href="https://www.gov.cn/zhengce/2020-12/26/content_5574802.htm">https://www.gov.cn/zhengce/2020-12/26/content_5574802.htm</a></p>
</blockquote>
<p>&emsp;&emsp;<strong>第六条</strong>　计算机信息网络直接进行国际联网，必须使用邮电部国家公用电信网提供的国际出入口信道。</p>
<p>任何单位和个人不得自行建立或者使用其他信道进行国际联网。</p>
<p>&emsp;&emsp;<strong>第十条</strong>　个人、法人和其他组织(以下统称用户)使用的计算机或者计算机信息网络，需要进行国际联网的，必须通过接入网络进行国际联网。</p>
<p>前款规定的计算机或者计算机信息网络，需要接入网络的，应当征得接入单位的同意，并办理登记手续。</p>
<p>&emsp;&emsp;<strong>第十四条</strong>　违反本规定第六条、第八条和第十条的规定的，由公安机关责令停止联网，给予警告，可以并处 15000 元以下的罚款；有违法所得的，没收违法所得。</p>
<h3 id="计算机信息网络国际联网安全保护管理办法节选">计算机信息网络国际联网安全保护管理办法(节选)</h3>
<blockquote>
<p><a href="http://www.gov.cn/zhengce/2020-12/26/content_5574873.htm">http://www.gov.cn/zhengce/2020-12/26/content_5574873.htm</a></p>
</blockquote>
<p>&emsp;&emsp;<strong>第四条</strong>　任何单位和个人不得利用国际联网危害国家安全、泄露国家秘密，不得侵犯国家的、社会的、集体的利益和公民的合法权益，不得从事违法犯罪活动。</p>
<p>&emsp;&emsp;<strong>第五条</strong>　任何单位和个人不得利用国际联网制作、复制、查阅和传播下列信息：</p>
<p>&emsp;&emsp;（一）煽动抗拒、破坏宪法和法律、行政法规实施的；</p>
<p>&emsp;&emsp;（二）煽动颠覆国家政权，推翻社会主义制度的；</p>
<p>&emsp;&emsp;（三）煽动分裂国家、破坏国家统一的；</p>
<p>&emsp;&emsp;（四）煽动民族仇恨、民族歧视，破坏民族团结的；</p>
<p>&emsp;&emsp;（五）捏造或者歪曲事实，散布谣言，扰乱社会秩序的；</p>
<p>&emsp;&emsp;（六）宣扬封建迷信、淫秽、色情、赌博、暴力、凶杀、恐怖，教唆犯罪的；</p>
<p>&emsp;&emsp;（七）公然侮辱他人或者捏造事实诽谤他人的；</p>
<p>&emsp;&emsp;（八）损害国家机关信誉的；</p>
<p>&emsp;&emsp;（九）其他违反宪法和法律、行政法规的。</p>
<p><nocopyright value="true"></nocopyright></p>

        ]]>
    </content>
</entry>
<entry>
    <title>记一次在 Termux 上搭建 code-server 环境</title>
    <link rel="alternate" type="text/html" href="https://dsy4567.github.io/blog/code-server-on-termux/" />
    <id>code-server-on-termux</id>
    <published>2023-07-31T13:17:09.742Z</published>
    <updated>2023-10-02T04:12:07.650Z</updated>
    <summary>记一次在 Termux 上搭建 code-server 环境
店里的电脑装着 Windows7，许多开发工具不能安装，因此有了远程开发的需求。说起远程开发，我第一个想到的肯定是 GitHub Codespaces。但这玩意服务器在国外，而且店里的宽带运营商是世界加钱可及的某信，裸连 GitHub Codespaces 时访问速度高达几十 kb/s。正好最近买了一台新手机，我准备在它上面借助 Termux 搭建 code-server 环境。
</summary>
    <author>
        <name>dsy4567</name>
        <uri>https://dsy4567.github.io/</uri>
    </author>
    <category term="Default" />
    <content type="html" xml:lang="zh-cn">
        <![CDATA[
<h1 id="记一次在-termux-上搭建-code-server-环境">记一次在 Termux 上搭建 code-server 环境</h1>
<p>店里的电脑装着 Windows7，许多开发工具不能安装，因此有了远程开发的需求。说起远程开发，我第一个想到的肯定是 GitHub Codespaces。但这玩意服务器在国外，而且店里的宽带运营商是<spoiler>世界加钱可及的</spoiler>某信，裸连 GitHub Codespaces 时访问速度高达几十 kb/s。正好最近买了一台新手机，我准备在它上面借助 Termux 搭建 code-server 环境。</p>
<!-- more -->

<h2 id="要求">要求</h2>
<ul>
<li>会使用 Linux</li>
<li>有一个域名（没有的话可以尝试折腾 hosts 文件）</li>
<li>有一部可以完美运行 Termux 的安卓手机</li>
<li>有一台安装了 ssh 工具（Git 已经内置）和浏览器的电脑</li>
</ul>
<h2 id="安装-termux">安装 Termux</h2>
<p>点击下面的链接，在 Assets 里下载合适的安装包。大多数安卓/哄蒙机应该选择文件名含 <code>arm64</code> 的安装包。</p>
<p><a href="https://github.com/termux/termux-app/releases/latest">https://github.com/termux/termux-app/releases/latest</a></p>
<blockquote>
<p>附：对于已开启纯净模式的哄蒙系统，安装时可能需要断网。</p>
</blockquote>
<h2 id="安装开发工具">安装开发工具</h2>
<h3 id="更换清华-termux-镜像（可选）">更换清华 Termux 镜像（可选）</h3>
<p>启动 Termux，初始化完成后执行以下命令：</p>
<pre><code class="language-bash">termux-change-repo
</code></pre>
<p><img src="/blog/code-server-on-termux/img/repo.webp" alt="s:540x1194 选择仓库"><img src="/blog/code-server-on-termux/img/mirror.webp" alt="s:540x1194 选择镜像"></p>
<p>确保 <code>Main repository</code> 被选中，然后按下回车，再使用上下键将光标移至清华镜像后按下空格和回车。</p>
<h3 id="安装和配置开发工具">安装和配置开发工具</h3>
<p>依次执行以下命令：</p>
<pre><code class="language-bash">#一股脑把需要的全装上
pkg install git nodejs-lts nginx python3 openssl-tool wget openssh vim screen -y
pkg up

#在这里查 code-server 的最新版本号，然后替换下面的版本号
#https://github.com/search?q=repo%3Atermux-user-repository%2Fdists%20dists%2Ftur-packages%2Ftur%2Fbinary-aarch64%2FPackages%20code-server&amp;type=code
wget https://ghproxy.com/https://github.com/termux-user-repository/dists/releases/download/0.1/code-server_4.17.1_aarch64.deb -O code-server.deb
apt-get --fix-broken install ./code-server.deb -y
#网快的也可以用这个
pkg install tur-repo -y
pkg install code-server -y

#更换淘宝源
npm config set registry https://registry.npmmirror.com
#将邮箱和用户名分别替换为 GitHub 绑定的邮箱和 GitHub 用户名
git config --global user.email &quot;username@example.com&quot;
git config --global user.name &quot;username&quot;
</code></pre>
<blockquote>
<p>注意：安装时看见 <code>The default action is to keep your current version.</code> 这句话可直接按回车</p>
<p><img src="/blog/code-server-on-termux/img/confirm.webp" alt="s:1080x394 The default action is to keep your current version."></p>
</blockquote>
<h2 id="为手机设置固定内网-ip">为手机设置固定内网 IP</h2>
<p>打开 WLAN 设置，按住已连接的网络，点击 “修改网络”。</p>
<p><img src="/blog/code-server-on-termux/img/wlan.webp" alt="s:540x344 修改网络"></p>
<p>点击“IP”，将“DHCP”改为“静态”。</p>
<p><img src="/blog/code-server-on-termux/img/dhcp.webp" alt="s:540x717 网络设置"></p>
<p>然后 <em><strong>参考</strong></em> 以下设置，修改后保存。</p>
<ul>
<li>IP 地址：<code>192.168.1.xx</code></li>
<li>网关：<code>192.168.1.1</code></li>
<li>网络前缀长度：<code>24</code></li>
<li>域名 1：<code>192.168.1.1</code></li>
<li>域名 2：<code>114.114.114.114</code></li>
</ul>
<p><img src="/blog/code-server-on-termux/img/ip.webp" alt="s:455.5x960 网络设置"></p>
<h2 id="配置域名">配置域名</h2>
<p>为域名添加以下记录：</p>
<table>
<thead>
<tr>
<th>类型</th>
<th>名称</th>
<th>值</th>
</tr>
</thead>
<tbody><tr>
<td>A</td>
<td>vscode</td>
<td>&lt;手机内网 IP&gt;</td>
</tr>
<tr>
<td>A</td>
<td>*.vscode</td>
<td>&lt;手机内网 IP&gt;</td>
</tr>
</tbody></table>
<p>如果没有域名，可以在 hosts 文件里添加以下内容</p>
<pre><code class="language-properties">#将 example.com 替换为你自己的域名
手机内网IP vscode.example.com
手机内网IP &lt;需要转发的端口1&gt;.vscode.example.com
手机内网IP &lt;需要转发的端口2&gt;.vscode.example.com
手机内网IP &lt;需要转发的端口3&gt;.vscode.example.com
...
</code></pre>
<h2 id="配置自签名证书">配置自签名证书</h2>
<blockquote>
<p>注意：必须妥善保管证书文件，泄露给他人有安全风险。</p>
</blockquote>
<p>执行以下命令：</p>
<pre><code class="language-bash">cd ~
mkdir ssl
cd ssl
vim ./csr.conf
</code></pre>
<p>按 <kbd>i</kbd> 进入编辑模式，粘贴以下内容：</p>
<pre><code class="language-properties">[req]
default_bits = 2048
prompt = no
default_md = sha256
req_extensions = req_ext
distinguished_name = dn

[dn]
C = CN
CN = foo
O = bar

[req_ext]
subjectAltName = @alt_names

[alt_names]
#将 example.com 替换为你自己的域名
DNS.1 = vscode.example.com
DNS.2 = *.vscode.example.com
DNS.3 = localhost
IP.1 = &lt;手机内网IP&gt;
IP.2 = 127.0.0.1
</code></pre>
<p>按 <kbd>Esc</kbd>，输入 <code>:wq</code> 并按回车后执行命令 <code>vim ./cert.conf</code>，再按 <kbd>i</kbd> 进入编辑模式，粘贴以下内容：</p>
<pre><code class="language-properties">authorityKeyIdentifier=keyid,issuer
basicConstraints=CA:FALSE
keyUsage = digitalSignature, nonRepudiation, keyEncipherment, dataEncipherment
subjectAltName = @alt_names

[alt_names]
#将 example.com 替换为你自己的域名
DNS.1 = vscode.example.com
DNS.2 = *.vscode.example.com
DNS.3 = localhost
IP.1 = &lt;手机内网IP&gt;
IP.2 = 127.0.0.1
</code></pre>
<p>按 <kbd>Esc</kbd>，输入 <code>:wq</code> 并按回车后，依次执行以下命令：</p>
<pre><code class="language-bash">openssl req -x509 -sha256 -days 3560 -nodes -newkey rsa:2048 -subj &quot;/CN=foo/C=CN/O=bar&quot; -keyout rootCA.key -out rootCA.crt
openssl genrsa -out server.key 2048
openssl req -new -key server.key -out server.csr -config csr.conf
openssl x509 -req -in server.csr -CA rootCA.crt -CAkey rootCA.key -CAcreateserial -out server.crt -days 365 -sha256 -extfile cert.conf
cd ~
</code></pre>
<h2 id="配置-ssh-服务">配置 ssh 服务</h2>
<p>依次执行以下命令：</p>
<pre><code class="language-bash">#设置密码，密码不会显示出来，输完后请自信按下回车
passwd

sshd
#显示内网 IP 地址
ifconfig
</code></pre>
<p>现在可以在同一局域网内另一台安装了 ssh 客户端的机器上执行以下命令，然后输入密码：</p>
<pre><code class="language-bash">ssh -p 8022 手机内网IP
</code></pre>
<p>如果显示下面的文字，输入 <code>yes</code> 并按回车</p>
<pre><code class="language-text">ED25519 key fingerprint is SHA256:balabala.
This key is not known by any other names
Are you sure you want to continue connecting (yes/no/[fingerprint])?
</code></pre>
<h2 id="安装根证书">安装根证书</h2>
<p>以 Windows 系统为例，在同一局域网内另一台安装了 ssh 客户端的机器上执行以下命令，然后输入密码：</p>
<pre><code class="language-bash">scp -P 8022 username@手机内网IP:~/ssl/rootCA.crt .
</code></pre>
<p>双击打开证书文件，点击“安装证书”，将证书添加到“受信任的根证书颁发机构”。</p>
<p><img src="/blog/code-server-on-termux/img/ca.webp" alt="s:748x787 安装 CA 证书"></p>
<h2 id="配置-nginx">配置 Nginx</h2>
<p>执行命令 <code>vim ~/../usr/etc/nginx/nginx.conf</code>，再按 <kbd>i</kbd> 进入编辑模式，删除已有内容，然后粘贴以下内容：</p>
<pre><code class="language-nginx">worker_processes 1;

events {
    worker_connections 1024;
}

http {
    sendfile on;
    keepalive_timeout 65;
    gzip on;
    #如果显示“could not build server_names_hash, you should increase server_names_hash_bucket_size”，可以将下面的数字改为更大的 32 的倍数
    server_names_hash_bucket_size 64;

    server {
        listen 7443 ssl;
        #将 example.com 替换为你自己的域名
        server_name *.vscode.example.com;

        ssl_certificate /data/data/com.termux/files/home/ssl/server.crt;
        ssl_certificate_key /data/data/com.termux/files/home/ssl/server.key;

        ssl_session_cache shared:SSL:1m;
        ssl_session_timeout 5m;

        ssl_ciphers HIGH:!aNULL:!MD5;
        ssl_prefer_server_ciphers on;

        location / {
            set $forward_port -1;
            if ($host ~ ^([0-9]+)\. ) {
                set $forward_port $1;
            }
            if ($forward_port = -1) {
                return 400;
            }
            proxy_pass http://127.0.0.1:$forward_port;
            proxy_set_header Host $proxy_host;
            proxy_set_header X-Real-IP $remote_addr;
            proxy_set_header X-Forwarded-For $proxy_add_x_forwarded_for;
        }
    }
}
</code></pre>
<p>按 <kbd>Esc</kbd>，输入 <code>:wq</code> 并按回车。</p>
<h2 id="编写启动脚本">编写启动脚本</h2>
<p>执行命令 <code>vim ~/android-as-linux.js</code>，再按 <kbd>i</kbd> 进入编辑模式，删除已有内容，粘贴以下内容：</p>
<pre><code class="language-js">Object.defineProperty(process, &quot;platform&quot;, {
    get() {
        return &quot;linux&quot;;
    },
});
</code></pre>
<p>按 <kbd>Esc</kbd>，输入 <code>:wq</code> 并按回车，然后执行命令 <code>vim ~/code-server.sh</code>，再按 <kbd>i</kbd> 进入编辑模式，删除已有内容，粘贴以下内容：</p>
<pre><code class="language-bash">#!/data/data/com.termux/files/usr/bin/bash
sshd
nginx -s quit
nginx
cat ~/.config/code-server/config.yaml
#见下方注意事项
export NODE_OPTIONS=&quot;--require /data/data/com.termux/files/home/android-as-linux.js&quot;
#将 example.com 替换为你自己的域名
code-server --host 0.0.0.0 --port 8443 --cert ~/ssl/server.crt --cert-key ~/ssl/server.key --proxy-domain vscode.example.com:7443
</code></pre>
<p>按 <kbd>Esc</kbd>，输入 <code>:wq</code> 并按回车，然后依次执行以下命令：</p>
<pre><code class="language-bash">chmod 777 ~/code-server.sh
~/code-server.sh
</code></pre>
<blockquote>
<p>退出按 <kbd>Ctrl</kbd> + <kbd>C</kbd> 并执行 <code>nginx -s quit</code></p>
</blockquote>
<p>至此，完整的开发环境已经准备好。在同一局域网内另一台机器上打开浏览器，在地址栏输入 <code>vscode.example.com</code>（将 example.com 替换为你自己的域名）并输入密码，就可以愉快地敲代码了。</p>
<p><img src="/blog/code-server-on-termux/img/code-server.webp" alt="s:1680x1010 code-server"></p>
<h2 id="注意事项">注意事项</h2>
<h3 id="扩展">扩展</h3>
<p>这里贴上官网的<a href="https://coder.com/docs/code-server/latest/termux#many-extensions-including-language-packs-fail-to-install">警告</a></p>
<blockquote>
<p>Note that Android and Linux are not 100% compatible, so use these workarounds at your own risk. Extensions that have native dependencies ther than Node or that directly interact with the OS might cause issues.</p>
</blockquote>
<p>这句话的意思是：上面强制让 code-server 认为它现在在 Linux 平台上跑的行为可能会出惹出一些问题：直接调用操作系统接口/包含二进制可执行文件的扩展可能无法正常运行，因为 Android 和 Linux 不完全兼容，出了问题你负责。</p>
<p>还有，code-server 的扩展由 <a href="https://open-vsx.org/">Open VSX Registry</a> 提供，但是一些扩展在这并没有上架，这时可以在 <a href="https://marketplace.visualstudio.com/">Visual Studio Marketplace</a> 上面找到需要的扩展，然后点击右侧的“Download Extension”。下载后将扩展文件拽到右侧的资源管理器，再点击右键 &gt; 安装扩展 VSIX。</p>
<p>顺便推荐一些我正在用的扩展：</p>
<ul>
<li><spoiler><del>厚着脸皮给自己打广告</del> 4399 on VSCode：在 VSCode 上玩 4399 小游戏</spoiler></li>
<li>Code Spell Checker：检查代码里的拼写错误，并给出修改建议</li>
<li>Comment Translate：翻译代码里的注释，支持替换需要翻译的文字</li>
<li>ESLint：规范代码风格</li>
<li>Gitmoji：快速在 Git 提交信息里插入 Emoji 表情</li>
<li>Path Intellisense：快速补全路径</li>
<li>Prettier：更漂亮的代码格式化工具</li>
</ul>

        ]]>
    </content>
</entry>
<entry>
    <title>如何优化网站加载速度</title>
    <link rel="alternate" type="text/html" href="https://dsy4567.github.io/blog/how-to-improve-performance/" />
    <id>how-to-improve-performance</id>
    <published>2023-06-24T07:38:27.834Z</published>
    <updated>2023-06-24T07:38:27.834Z</updated>
    <summary>如何优化网站加载速度
中考完了之后，闲的没事的我拿 LightHouse 测了一下自己的网站，发现分数有点低。为了拿到四个圆圈圈以满足我的虚荣心，我决定花些力气来优化网站性能。
</summary>
    <author>
        <name>dsy4567</name>
        <uri>https://dsy4567.github.io/</uri>
    </author>
    <category term="Default" />
    <content type="html" xml:lang="zh-cn">
        <![CDATA[
<h1 id="如何优化网站加载速度">如何优化网站加载速度</h1>
<p>中考完了之后，闲的没事的我拿 LightHouse 测了一下自己的网站，发现分数有点低。为了拿到四个圆圈圈<del>以满足我的虚荣心</del>，我决定花些力气来优化网站性能。</p>
<!-- more -->

<p>废话不多说，先把图放上来。</p>
<p>优化前：</p>
<p><a href="https://pagespeed.web.dev/analysis/https-dsy4567-cf/gf94qbiu4z"><img src="/blog/how-to-improve-performance/img/before.webp" alt="s:969x835 优化前"></a></p>
<p>优化后：</p>
<p><a href="https://pagespeed.web.dev/analysis/https-dsy4567-cf/jyhkiaf907"><img src="/blog/how-to-improve-performance/img/after.webp" alt="s:964x831 优化后"></a></p>
<h2 id="为什么优化网站加载速度很重要">为什么优化网站加载速度很重要</h2>
<p>像我这种有点耐心<spoiler>（还不是被某堵墙和我这老爷机逼的）</spoiler>的人，逛加载速度慢网站通常会一边忍着一边想带妈的词语。而一些没耐心的人进了这种网站，肯定会想<code>这™什么破网站</code>，然后立马点叉。对于用户很多的电商平台来说，网站加载时间每多 100ms，用户越没有耐心看下去，然后电商平台就要少赚好几沓钞票。</p>
<h2 id="少说废话，进入正题">少说废话，进入正题</h2>
<h3 id="多用-getelementsbyxxx，少用-queryselectorall">多用 <code>getElement(s)ByXxx</code>，少用 <code>querySelector(All)</code></h3>
<p><img src="/blog/how-to-improve-performance/img/compare-gebxxx-qs.webp" alt="s:428x362 用一段代码比较 getElement(s)ByXxx 和 querySelector(All) 的性能"></p>
<p>由图可知，二者的速度差距挺大的。虽然 <code>querySelector(All)</code> 用起来又舒服又方便，但它是真的慢。平时写代码的时候，我们应该权衡方便和性能，最好只在 <code>getElement(s)ByXxx</code> 满足不了要求时才用 <code>querySelector(All)</code>。</p>
<h3 id="善用预加载">善用预加载</h3>
<p>如果你的网页有可能会晚些加载的资源（比如动态加载脚本、CSS 里的背景图片），可以在<code>&lt;head&gt;</code> 里添加 <code>&lt;link rel=&quot;preload&quot;/&gt;</code> 或 <code>&lt;link rel=&quot;dns-prefetch&quot;&gt;</code>，声明稍后可能会加载的资源，举个栗子：</p>
<pre><code class="language-html">&lt;!DOCTYPE html&gt;
&lt;html lang=&quot;zh-CN&quot;&gt;
    &lt;head&gt;
        &lt;!-- ... --&gt;

        &lt;link rel=&quot;dns-prefetch&quot; href=&quot;https://api.github.com&quot; /&gt;
        &lt;link rel=&quot;dns-prefetch&quot; href=&quot;https://www.googletagmanager.com&quot; /&gt;

        &lt;link rel=&quot;preload&quot; href=&quot;/js/ncm.js&quot; as=&quot;script&quot; crossorigin=&quot;anonymous&quot; /&gt;
        &lt;link rel=&quot;preload&quot; href=&quot;/json/icon.json&quot; as=&quot;fetch&quot; crossorigin=&quot;anonymous&quot; /&gt;
        &lt;link rel=&quot;preload&quot; href=&quot;/json/theme.json&quot; as=&quot;fetch&quot; crossorigin=&quot;anonymous&quot; /&gt;
    &lt;/head&gt;
    &lt;!-- ... --&gt;
&lt;/html&gt;
</code></pre>
<p>具体用法可以看看<a href="https://developer.mozilla.org/en-US/docs/Web/HTML/Attributes/rel/preload">这篇 MDN 文档（英语）</a>。</p>
<h3 id="为-script-标签添加-async-或-defer-属性">为 <code>&lt;script&gt;</code> 标签添加 <code>async</code> 或 <code>defer</code> 属性</h3>
<p>如果脚本不需要尽快执行，添加这两个属性可以让浏览器尽快渲染网页，而不必等待脚本执行完毕。</p>
<p>需要注意的是，添加 <code>async</code> 属性后，<code>DOMContentLoaded</code> 事件可能无法触发。</p>
<h3 id="更多做法">更多做法</h3>
<p>这些做法我就不细说了</p>
<ul>
<li>推迟加载不太重要的资源</li>
<li>压缩资源（这个我不想搞）</li>
<li>少用小站长提供的接口，说不定哪一天就变慢或者崩掉了，建议自行搭建</li>
<li>少用费资源的 CSS 方法（比如 <code>blur()</code>）</li>
</ul>

        ]]>
    </content>
</entry>
<entry>
    <title>使用 CloudFlare Workers 免费搭建 Virtual Judge 反代</title>
    <link rel="alternate" type="text/html" href="https://dsy4567.github.io/blog/cf-vjmirror/" />
    <id>cf-vjmirror</id>
    <published>2023-05-20T14:57:26.700Z</published>
    <updated>2023-05-21T03:19:53.502Z</updated>
    <summary>使用 CloudFlare Workers 免费搭建 Virtual Judge 反代
最近闲的没事干，受 如何科学地制作一个镜像反代站点 这篇文章的启发，我一个买不起服务器的穷逼准备用 CF Workers 搭一个 Virtual Judge 反代，以缓解 VJ 在大陆经常断网的情况。而且 CF Workers 有更高的 SLA 保证，如果运气好，访问速度还会嘎嘎快。
</summary>
    <author>
        <name>dsy4567</name>
        <uri>https://dsy4567.github.io/</uri>
    </author>
    <category term="Default" />
    <content type="html" xml:lang="zh-cn">
        <![CDATA[
<h1 id="使用-cloudflare-workers-免费搭建-virtual-judge-反代">使用 CloudFlare Workers 免费搭建 Virtual Judge 反代</h1>
<p>最近闲的没事干，受 <a href="https://blog.immccn123.xyz/archives/362">如何科学地制作一个镜像反代站点</a> 这篇文章的启发，我一个买不起服务器的穷逼准备用 CF Workers 搭一个 Virtual Judge 反代，以缓解 VJ 在大陆经常断网的情况。而且 CF Workers 有更高的 SLA 保证，如果运气好，访问速度还会嘎嘎快。</p>
<!-- more -->

<blockquote>
<p>千万不要反代<spoiler>反 D、色情、赌博等</spoiler>违规网站，小心你家水表坏了。</p>
</blockquote>
<h2 id="注册-cf">注册 CF</h2>
<p>这个就不用我浪费口水了，传送门 -&gt; <a href="https://dash.cloudflare.com/">https://dash.cloudflare.com/</a></p>
<h2 id="创建-cf-worker">创建 CF Worker</h2>
<blockquote>
<p>这一步需要先把域名绑到 CF 里面，因为 <code>*.workers.dev</code> 有墙。</p>
</blockquote>
<blockquote>
<p>可以到 Freenom 那里搞一个免费域名.</p>
</blockquote>
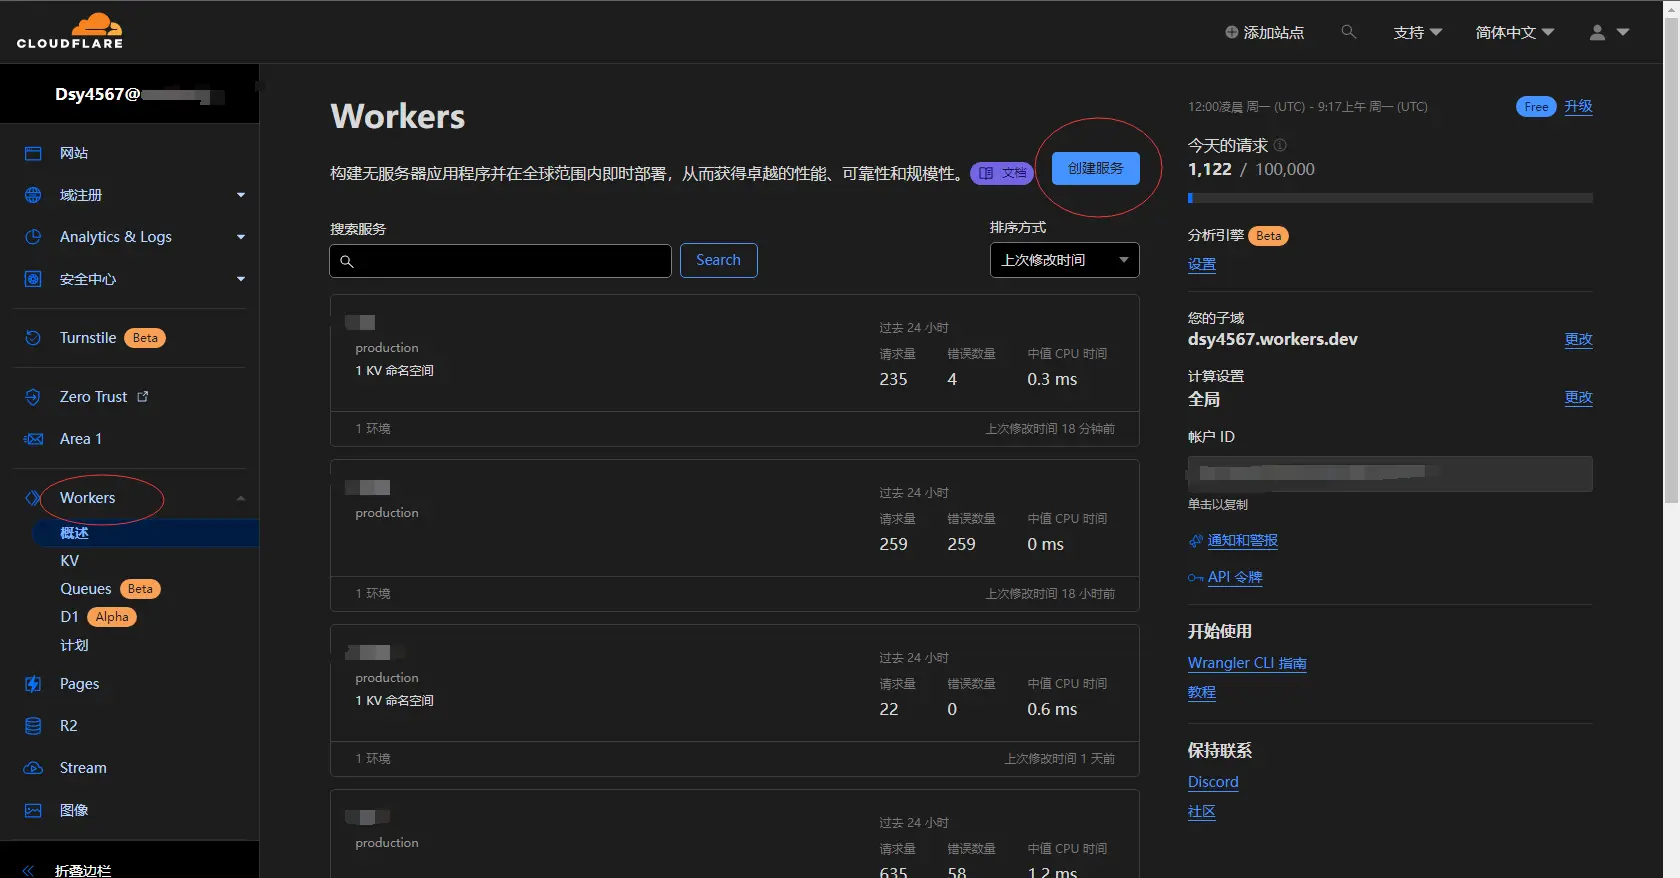
<p>登录 <a href="https://dash.cloudflare.com/">Cloudflare Dashboard</a>，点击右边的 Workers，再点右边的创建服务。</p>
<p><img src="https://dsy4567.icu/blog/cf-workers-ip/img/workers.webp" alt="s:1680x878 Workers 面板"></p>
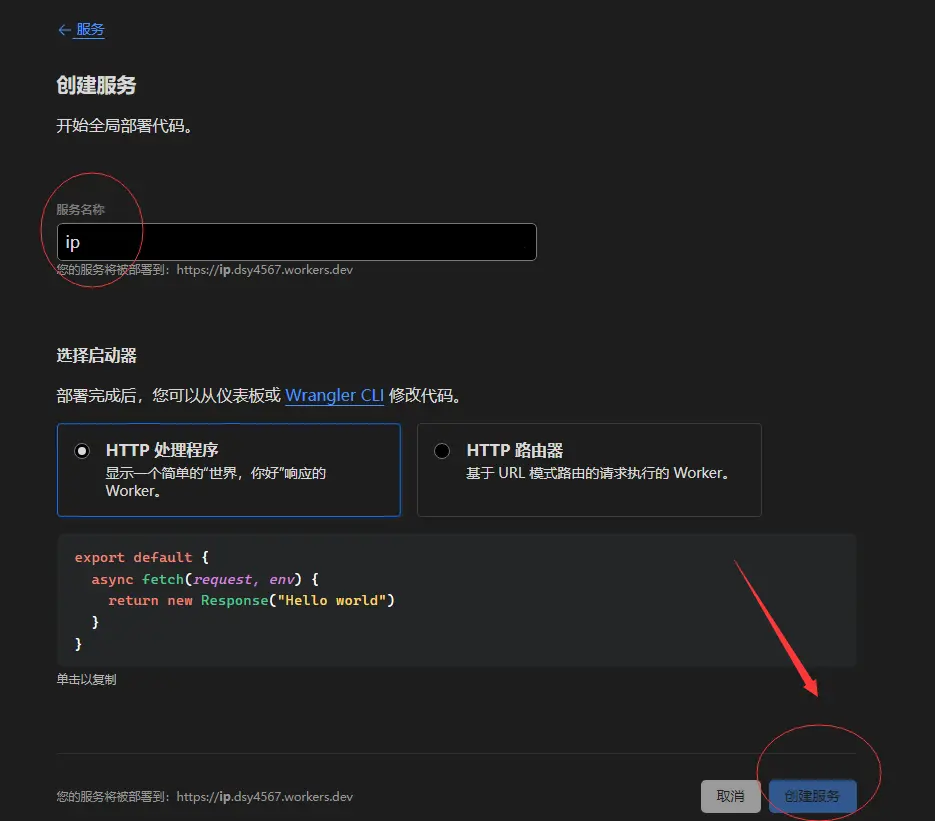
<p>服务名称随便，点击创建服务。</p>
<p><img src="https://dsy4567.icu/blog/cf-workers-ip/img/%E5%88%9B%E5%BB%BA%E6%9C%8D%E5%8A%A1.webp" alt="s:935x821 创建服务"></p>
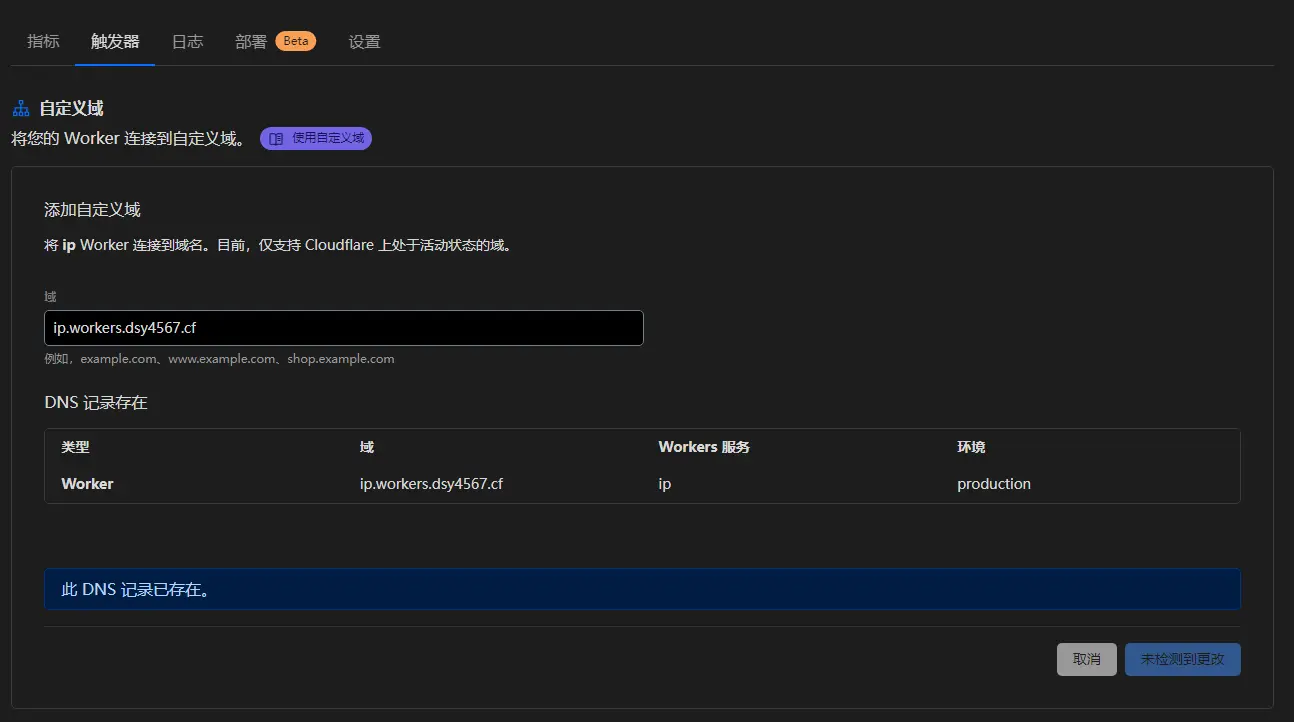
<p>绑定自定义域。</p>
<p>触发器 &gt; 自定义域，在这里输入 Worker 要绑的域名。</p>
<p><img src="https://dsy4567.icu/blog/cf-workers-ip/img/%E8%87%AA%E5%AE%9A%E4%B9%89%E5%9F%9F.webp" alt="s:1294x722 自定义域"></p>
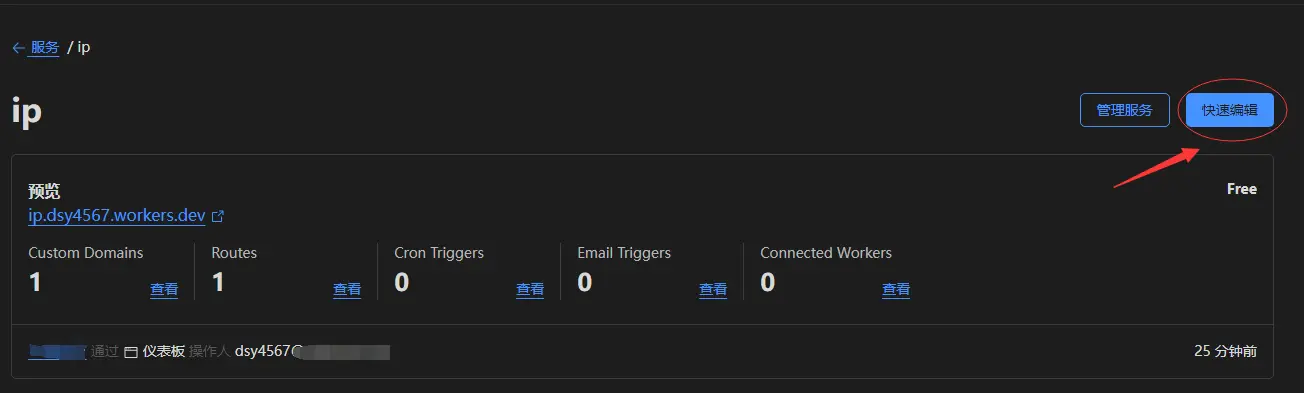
<p>点击快速编辑。</p>
<p><img src="https://dsy4567.icu/blog/cf-workers-ip/img/%E7%AE%A1%E7%90%86%E9%9D%A2%E6%9D%BF.webp" alt="s:1304x393 管理面板"></p>
<p>粘贴以下代码，然后保存并部署：</p>
<pre><code class="language-js">export default {
    async fetch(request, env, ctx) {
        let u = new URL(request.url);
        const originHost = &quot;vjudge.net&quot;,
            mirrorHost = u.hostname;
        u.hostname = originHost;

        Object.defineProperty(request, &quot;url&quot;, {
            value: u,
            writable: true,
        });
        let resp = await fetch(u, request);

        if (resp.headers.get(&quot;content-type&quot;).includes(&quot;text/&quot;)) {
            let body = await resp.text();
            body.replace(new RegExp(originHost, &quot;g&quot;), mirrorHost);
            return new Response(body, resp);
        }
        return resp;
    },
};
</code></pre>
<p>接下来，访问你绑定的域名。</p>
<h2 id="登录镜像站">登录镜像站</h2>
<p>由于 CF Workers 不让改 <code>set-cookie</code> 请求头，你需要花很大力气登录 <code>vjudge.net</code>，然后把 cookies 复制到镜像站里。</p>
<p>打开 <a href="https://vjudge.net">https://vjudge.net</a>，登录后打开开发者工具 &gt; 应用 &gt; cookie &gt; <code>https://vjudge.net</code>。</p>
<p>再打开 <a href="https://%E4%BD%A0%E7%BB%91%E5%AE%9A%E7%9A%84%E5%9F%9F%E5%90%8D">https://你绑定的域名</a>，登录后打开开发者工具 &gt; 应用 &gt; cookie &gt; <code>https://你绑定的域名</code>，将两个 <code>JSESSIONID</code> 复制粘贴过去，然后刷新镜像站，就可以完成登录。</p>
<p><img src="/blog/cf-vjmirror/img/devtools.webp" alt="s:997x285 开发者工具"></p>
<hr>
<p>最后，尽情享受吧~</p>
<p>Demo（已失效）：<del><a href="https://vjmirror.workers.dsy4567.cf/">https://vjmirror.workers.dsy4567.cf/</a></del></p>

        ]]>
    </content>
</entry>
<entry>
    <title>使用 Cloudflare Workers 获取别人的 IP 地址</title>
    <link rel="alternate" type="text/html" href="https://dsy4567.github.io/blog/cf-workers-ip/" />
    <id>cf-workers-ip</id>
    <published>2023-02-13T09:55:45.491Z</published>
    <updated>2023-02-13T09:55:45.491Z</updated>
    <summary>使用 Cloudflare Workers 获取别人的 IP 地址
本文将教你怎么顺着网线找到别人（
</summary>
    <author>
        <name>dsy4567</name>
        <uri>https://dsy4567.github.io/</uri>
    </author>
    <category term="Default" />
    <content type="html" xml:lang="zh-cn">
        <![CDATA[
<h1 id="使用-cloudflare-workers-获取别人的-ip-地址">使用 Cloudflare Workers 获取别人的 IP 地址</h1>
<p>本文将教你怎么顺着网线找到别人（</p>
<!-- more -->

<h2 id="准备工作">准备工作</h2>
<ul>
<li>一个 CF 账号</li>
<li>一个已绑定到 Cloudflare 的域名(*.workers.dev 域名已被屏蔽)</li>
</ul>
<h2 id="创建-worker">创建 Worker</h2>
<p>登录 <a href="https://dash.cloudflare.com/">Cloudflare Dashboard</a>，点击右边的 Workers，再点右边的创建服务。</p>
<p><img src="/blog/cf-workers-ip/img/workers.webp" alt="s:1680x878 Workers 面板"></p>
<p>服务名称随意填写，然后点击创建服务。</p>
<p><img src="/blog/cf-workers-ip/img/%E5%88%9B%E5%BB%BA%E6%9C%8D%E5%8A%A1.webp" alt="s:935x821 创建服务"></p>
<p>点击快速编辑。</p>
<p><img src="/blog/cf-workers-ip/img/%E7%AE%A1%E7%90%86%E9%9D%A2%E6%9D%BF.webp" alt="s:1304x393 管理面板"></p>
<p>粘贴以下代码，然后点击保存并部署。</p>
<pre><code class="language-JavaScript">export default {
    async fetch(request, env) {
        let namespace = env.ip,
            u = new URL(request.url),
            ip = request.headers.get(&quot;CF-Connecting-IP&quot;);
        u.pathname == &quot;/114514&quot; &amp;&amp; // 免费版每天只有一千次读写, 防滥用
            (await namespace.put(new Date().toUTCString(), ip));
        return new Response(ip);
    },
};
</code></pre>
<h2 id="创建和绑定-kv-命名空间">创建和绑定 KV 命名空间</h2>
<p>返回，依次点击右边的 Workers &gt; KV，然后点击创建命名空间 &gt; 添加。</p>
<p><img src="/blog/cf-workers-ip/img/kv.webp" alt="s:1656x891 KV"></p>
<p>回到 Worker 详情页，点击设置 &gt; 变量 &gt; KV 命名空间绑定。</p>
<p>变量名称填 <code>ip</code>，KV 命名空间选刚才创建的那个，保存并部署。</p>
<p><img src="/blog/cf-workers-ip/img/%E8%AE%BE%E7%BD%AE.webp" alt="s:1322x842 设置页"></p>
<h2 id="绑定自定义域">绑定自定义域</h2>
<p>点击触发器 &gt; 自定义域。</p>
<p><img src="/blog/cf-workers-ip/img/%E8%87%AA%E5%AE%9A%E4%B9%89%E5%9F%9F.webp" alt="s:1294x722 自定义域"></p>
<p>把 <code>https://&lt;你的自定义域&gt;/114514</code> 这个网址发给别人访问，一段时间后，回到之前创建的 KV 命名空间，IP 就出来了。</p>
<p><img src="/blog/cf-workers-ip/img/ip.webp" alt="s:1680x895 KV 命名空间管理面板"></p>
<h2 id="参考资料">参考资料</h2>
<p>Cloudflare Workers 文档 <a href="https://developers.cloudflare.com/workers/">https://developers.cloudflare.com/workers/</a></p>
<p>恢复原始访问者 IP - Cloudflare 帮助中心 <a href="https://support.cloudflare.com/hc/zh-cn/articles/200170786-%E6%81%A2%E5%A4%8D%E5%8E%9F%E5%A7%8B%E8%AE%BF%E9%97%AE%E8%80%85-IP">https://support.cloudflare.com/hc/zh-cn/articles/200170786-恢复原始访问者-IP</a></p>

        ]]>
    </content>
</entry>
<entry>
    <title>P1932 题解</title>
    <link rel="alternate" type="text/html" href="https://dsy4567.github.io/blog/P1932/" />
    <id>P1932</id>
    <published>2023-02-04T08:56:05.388Z</published>
    <updated>2023-02-04T08:56:05.388Z</updated>
    <summary>P1932 题解
</summary>
    <author>
        <name>dsy4567</name>
        <uri>https://dsy4567.github.io/</uri>
    </author>
    <category term="Default" />
    <content type="html" xml:lang="zh-cn">
        <![CDATA[
<h1 id="p1932-题解">P1932 题解</h1>
<!-- more -->

<h2 id="原题">原题</h2>
<blockquote>
<p><a href="https://www.luogu.com.cn/problem/P1932">https://www.luogu.com.cn/problem/P1932</a></p>
</blockquote>
<pre><code class="language-plaintext">A+B  A-B  A*B  A/B A%B Problem

# 题目背景

这个题目很新颖吧！！！

# 题目描述

求A、B的和差积商余！

由于数据有修改，减法运算结果可能带负号！

# 输入格式

两个数两行

A
B

# 输出格式

五个数

和
差
积
商
余

# 样例 #1

样例输入 #1

1
1

样例输出 #1

2
0
1
1
0

# 提示

length(A),length(B)&lt;=10^4

A,B&gt;0
每个点3s。
</code></pre>
<hr>
<h2 id="代码">代码</h2>
<pre><code class="language-python">a,b=int(input()),int(input())
print(a+b)
print(a-b)
print(a*b)
print(a//b)
print(a%b)
</code></pre>
<p>Python <abbr title="永远单身">YYDS!</abbr></p>
<blockquote>
<p><a href="https://www.luogu.com.cn/record/107080406">https://www.luogu.com.cn/record/107080406</a></p>
</blockquote>

        ]]>
    </content>
</entry>
<entry>
    <title>(转) CCF NOI 历年处罚公告</title>
    <link rel="alternate" type="text/html" href="https://dsy4567.github.io/blog/ccf-noi-lncfgg/" />
    <id>ccf-noi-lncfgg</id>
    <published>2023-01-16T09:41:54.000Z</published>
    <updated>2023-01-16T09:41:54.000Z</updated>
    <summary>(转) CCF NOI 历年处罚公告

转自 https://fucksc.cf/penalties/

前言
本文旨在让各位选手/监考老师/特派员在历次处罚中引以为戒, 请各位读者理性看待以下事件, 不要对当事人/CCF做出不恰当的行为
</summary>
    <author>
        <name>dsy4567</name>
        <uri>https://dsy4567.github.io/</uri>
    </author>
    <category term="Default" />
    <content type="html" xml:lang="zh-cn">
        <![CDATA[
<h1 id="转-ccf-noi-历年处罚公告">(转) CCF NOI 历年处罚公告</h1>
<blockquote>
<p>转自 <a href="https://fucksc.cf/penalties/">https://fucksc.cf/penalties/</a></p>
</blockquote>
<h2 id="前言">前言</h2>
<p>本文旨在让各位选手/监考老师/特派员在历次处罚中引以为戒, 请各位读者理性看待以下事件, 不要对当事人/CCF做出不恰当的行为</p>
<!-- more -->

<h2 id="2023">2023</h2>
<blockquote>
<p>PR welcome!</p>
</blockquote>
<h2 id="2022">2022</h2>
<p>关于对成都树德中学指导教师刘强的处罚公告 <a href="https://www.noi.cn/xw/2022-09-16/774011.shtml">https://www.noi.cn/xw/2022-09-16/774011.shtml</a></p>
<h2 id="2021">2021</h2>
<p>关于个别选手在NOIP 2021中使用暴戾语言的处罚公告 <a href="https://www.noi.cn/xw/2021-12-03/750909.shtml">https://www.noi.cn/xw/2021-12-03/750909.shtml</a></p>
<p>CCF关于竞赛及能力认证作弊处罚办法的公告 <a href="https://www.noi.cn/xw/2021-11-30/750857.shtml">https://www.noi.cn/xw/2021-11-30/750857.shtml</a></p>
<p>CCF关于对CSP-J/S 2021第二轮认证违规处罚的公告 <a href="https://www.noi.cn/xw/2021-11-05/749732.shtml">https://www.noi.cn/xw/2021-11-05/749732.shtml</a></p>
<p>关于在NOI教师培训中程序雷同的处罚公告 <a href="https://www.noi.cn/xw/2021-05-24/729110.shtml">https://www.noi.cn/xw/2021-05-24/729110.shtml</a></p>
<h2 id="2020">2020</h2>
<p>关于对NOIP2020省组织单位工作失误处罚的公告 <a href="https://www.noi.cn/xw/2020-12-15/718386.shtml">https://www.noi.cn/xw/2020-12-15/718386.shtml</a></p>
<p>CCF关于对CSP-J/S2020第二轮认证违规处罚的公告 <a href="https://www.noi.cn/xw/2020-12-10/718309.shtml">https://www.noi.cn/xw/2020-12-10/718309.shtml</a></p>
<p>关于对侵犯CCF知识产权进行处罚结果的通告 <a href="https://www.noi.cn/xw/2020-10-28/715723.shtml">https://www.noi.cn/xw/2020-10-28/715723.shtml</a></p>
<p>CCF关于对干扰认证秩序者的处罚公告 <a href="https://www.noi.cn/xw/2020-10-12/715677.shtml">https://www.noi.cn/xw/2020-10-12/715677.shtml</a></p>
<h2 id="2019">2019</h2>
<p>CCF关于对CSP-J/S2019第二轮认证违规处罚的公告 <a href="https://www.noi.cn/xw/2019-12-09/715513.shtml">https://www.noi.cn/xw/2019-12-09/715513.shtml</a></p>
<p>关于NOI黑龙江特派员王宇华违规处罚的公告 <a href="https://www.noi.cn/xw/2019-11-18/715498.shtml">https://www.noi.cn/xw/2019-11-18/715498.shtml</a></p>
<h2 id="2018">2018</h2>
<p>CCF关于对NOIP2018复赛违规处罚的公告 <a href="https://www.noi.cn/xw/2018-12-10/715288.shtml">https://www.noi.cn/xw/2018-12-10/715288.shtml</a></p>
<p>CCF关于公布NOIP2018初赛违规事件的处罚公告 <a href="https://www.noi.cn/xw/2018-11-01/715273.shtml">https://www.noi.cn/xw/2018-11-01/715273.shtml</a></p>
<h2 id="2017">2017</h2>
<p>CCF关于NOIP2017复赛违规省份的处罚公告 <a href="https://www.noi.cn/xw/2017-11-30/715177.shtml">https://www.noi.cn/xw/2017-11-30/715177.shtml</a></p>
<p>CCF关于公布NOIP2017初赛违规事件的处罚公告 <a href="https://www.noi.cn/xw/2017-11-10/715172.shtml">https://www.noi.cn/xw/2017-11-10/715172.shtml</a></p>
<p>CCF关于实施NOI省选中处罚名额的说明 <a href="https://www.noi.cn/xw/2017-04-07/715144.shtml">https://www.noi.cn/xw/2017-04-07/715144.shtml</a></p>
<h2 id="2016">2016</h2>
<p>CCF 关于NOIP2016违规事件的处罚公告 <a href="https://www.noi.cn/xw/2016-12-16/715131.shtml">https://www.noi.cn/xw/2016-12-16/715131.shtml</a></p>
<h2 id="2015">2015</h2>
<p>CCF关于NOIP2015复赛违规省份的处罚公告 <a href="https://www.noi.cn/xw/2015-11-27/715099.shtml">https://www.noi.cn/xw/2015-11-27/715099.shtml</a></p>
<p>CCF关于河北武邑中学在NOIP2015初赛中违规的处罚通知 <a href="https://www.noi.cn/xw/2015-11-11/715095.shtml">https://www.noi.cn/xw/2015-11-11/715095.shtml</a></p>
<p>CCF关于公布NOIP2015初赛违规事件处罚的通告 <a href="https://www.noi.cn/xw/2015-11-04/715094.shtml">https://www.noi.cn/xw/2015-11-04/715094.shtml</a></p>
<h2 id="2014">2014</h2>
<blockquote>
<p>PR welcome!</p>
</blockquote>
<h2 id="2013">2013</h2>
<p>CCF关于对NOIP2013初赛违规事件相关学校和选手处罚决定的通告 <a href="https://www.noi.cn/xw/2013-11-26/715014.shtml">https://www.noi.cn/xw/2013-11-26/715014.shtml</a></p>
<p>CCF对NOIP作弊选手处罚结果的公告 <a href="https://www.noi.cn/xw/2013-01-11/714963.shtml">https://www.noi.cn/xw/2013-01-11/714963.shtml</a></p>
<h2 id="2012">2012</h2>
<p>CCF关于对NOIP作弊选手处罚决定的通告 <a href="https://www.noi.cn/xw/2012-12-12/714962.shtml">https://www.noi.cn/xw/2012-12-12/714962.shtml</a></p>
<h2 id="2011">2011</h2>
<p>CCF关于对NOI违约选手处罚决定的通告 <a href="https://www.noi.cn/xw/2011-11-18/714897.shtml">https://www.noi.cn/xw/2011-11-18/714897.shtml</a></p>
<h2 id="相关资源">相关资源</h2>
<p>做干净的奥赛 <a href="https://www.noi.cn/xw/2009-08-31/714736.shtml">https://www.noi.cn/xw/2009-08-31/714736.shtml</a></p>
<p>全国青少年信息学奥林匹克竞赛条例 <a href="https://www.noi.cn/gynoi/tlgd/2008-12-25/710424.shtml#:~:text=%E8%B5%9B%E5%9C%BA%E8%A7%84%E5%AE%9A%EF%BC%9B-,8)%20%E5%85%B6%E4%BB%96%E5%8F%AF%E8%83%BD%E5%BD%B1%E5%93%8D%E5%85%AC%E5%B9%B3%E7%AB%9E%E8%B5%9B%E7%9A%84%E5%85%B6%E4%BB%96%E8%A1%8C%E4%B8%BA%E3%80%82,-10.%20%E5%85%B6%E4%BB%96%E4%BA%BA%E5%91%98">https://www.noi.cn/gynoi/tlgd/2008-12-25/710424.shtml#:~:text=赛场规定；-,8)%20其他可能影响公平竞赛的其他行为。,-10.%20其他人员</a></p>
<h2 id="其他信息">其他信息</h2>
<p>本文可随意转载/修改, 无需注明出处</p>
<p><nocopyright value="true"></nocopyright></p>

        ]]>
    </content>
</entry>
<entry>
    <title>(水文)2022 €€£ €$₽ J 组第二轮游寄</title>
    <link rel="alternate" type="text/html" href="https://dsy4567.github.io/blog/2022-ccf-csp-j-you-ji/" />
    <id>2022-ccf-csp-j-you-ji</id>
    <published>2023-01-12T16:00:00.000Z</published>
    <updated>2023-01-12T16:00:00.000Z</updated>
    <summary>(水文)2022 €€£ €$₽ J 组第二轮游寄
2022-10-28
J 组取消, S 组继续, 游寄结束


本文可随意转载/修改, 无需注明出处


</summary>
    <author>
        <name>dsy4567</name>
        <uri>https://dsy4567.github.io/</uri>
    </author>
    <category term="Default" />
    <content type="html" xml:lang="zh-cn">
        <![CDATA[
<h1 id="水文2022-€€£-€₽-j-组第二轮游寄">(水文)2022 <abbr title="CCF CSP(China Computer Federation Certified Software Professional, CCF 软件能力认证)的货币符号形式, 体现了 CCF 贪财的特点">€€£ €$₽</abbr> J 组第二轮游寄</h1>
<h2 id="2022-10-28">2022-10-28</h2>
<p>J 组取消, S 组继续, 游寄结束</p>
<p><a href="https://www.noi.cn/gs/xw/sx1/2022-10-28/775827.shtml?province=df"><img src="/blog/2022-ccf-csp-j-you-ji/img/cover.webp" alt="s:874x370 棺方通知"></a></p>
<blockquote>
<p>本文可随意转载/修改, 无需注明出处</p>
</blockquote>
<p><nocopyright value="true"></nocopyright></p>

        ]]>
    </content>
</entry></feed>